Live Chat with our experts & get real-time answers to all your queries. Chat Now Linksys Atlas Pro 6 Setup is a mandatory process to complete before starting to use the internet. If you do not know how to do it, here is the right guidance for you. Linksys Atlas Pro 6 is a smart Mesh WiFi device that uses dual-band frequency to broadcast network signals. It is a modern-generation innovative WiFi device and a pro version of the Linksys Atlas 6. The WiFi device comes with a range of useful features including OFDMA, MU-MIMO, Qualcomm Immersive Home 216 Platform, Automatic Firmware Updates, Advanced Security, High Power PAs, and Linksys Atlas Pro 6 Setup and Control with the Linksys App. In addition to this, the Linksys Atlas Pro 6 features a seamless Mesh WiFi system that can be expanded readily. This innovative WiFi solution serves a wide variety of purposes. Whether you wish to improve your experience of enjoying online 4K or 8K streaming, online learning, or AR/VR gaming, Linksys Atlas Pro 6 is a perfect solution. With this, you can start enjoying incredible internet connectivity throughout your home or office right away after completing a mandatory Linksys Atlas Pro 6 Setup process. There are two major setup options for Linksys Atlas Pro 6 Velop routers; Linksys Mobile app-based setup and web browser-based configuration. Both these setup processes are simple to carry out. You can use an Android, iOS, or Window device to perform Linksys Atlas Pro 6 setup using these methods. Generally, it takes only a maximum of 10 minutes to set up a Linksys Atlas Pro 6 Velop device, but sometimes, you might encounter some errors and obstacles. To avoid any sort of issues during the setup process, it is important to know about the setup method correctly and deeply. Here, we will assist you with understanding and performing the Linksys Velop configuration procedure using different methods. Let’s get started. As both processes will require you to access the setup portal you will also need to log into the Velop. Clearly, there will be a need to use the default login credentials as this is your first login. To get the details, check the quick manual setup guide and note them somewhere to avoid hassles in setup. However, you must change Linksys Atlas Pro 6 Setup password for the network’s safety purposes. Linksys App is versatile as it allows users to perform various actions such as login, setup, setting modifications, and many more. You can execute the Linksys Atlas Pro 6 Setup as well with the help of this app. You simply require to follow the aforementioned steps. Once you have completed the setup process, you can use the Linksys app to manage and control your router’s settings and configurations. In case you are unable to get going with this setup process or have any trouble with this, connect to our technical support team. They will assist you with this. Once you are done with these setup steps, your Linksys Atlas Pro 6 will be ready to use. If you have trouble accessing the Linksys Setup Web Portal, make sure that your computer is connected to the same network as the Linksys Atlas Pro 6 and that your web browser is up to date. If you still have issues, you may need to reset your Linksys Atlas Pro 6 to its default settings and start the setup process again. After completing the setup, you must change its default network password as this is easy to guess. Which can lead to unauthorized access, hackers, and serious risks to the network’s data. To change Linksys Atlas Pro 6 setup password, access the management window on the web interface and choose Security Settings. Afterward, click on the Password option and set a new one by replacing the older one. Make sure to add some special, numeric, and upper-lower characters to it so that it is strong enough. So, it becomes hard to access for external users. You may come across many different types of errors while attempting to set up the Atlas Pro 6 Velop device. These errors can be resolved using different tricks. However, sometimes, nothing works. If you find yourself stuck in such a situation where no trick gives the desired output, resetting your device is the right approach. To reset your Atlas Pro 6 device to factory default settings, you simply need to press the “Reset” button on the node and hold it until the Power LED starts blinking. There is no more action required. The Linksys device will automatically change the customized settings and reset it to the factory default. Within a few seconds, your devices will be reset to factory default and ready for the setup. For better performance of your device and smooth and hassle-free Linksys Atlas Pro 6 setup, we recommend you power cycle your device after finishing the factory reset process. The Linksys Atlas Pro 6 kit comes with a few items and accessories, including an Atlas Pro 6 gadget, an ethernet cable, and a user manual. The Linksys Atlas Pro 6 Manual contains complete information about the device. You may find about the product’s basic features, functions, and characteristics in it. Also, there are comprehensive details on Linksys Atlas Pro 6 Login, Setup, and other procedures like troubleshooting. You can use these details to learn about your Linksys Atlas network. You will have an in-depth knowledge of the login, setup, and troubleshooting. The Linksys Atlas Pro 6 Manual is written in multiple languages to facilitate users. The first language is English while the other languages are French and Spanish. If you speak French or Spanish but don’t know English, you can still read and understand the content of the Linksys Atlas Pro 6 Manual. In case you fail to interpret the user Manual of Linksys Atlas Pro 6, we would recommend you connect to technical experts. They may better help you with this. Despite trying out all the setup options we have mentioned here, if you are unable to execute the Linksys Atlas Pro 6 setup, connect to our technical support team. They specialize in resolving all sorts of technical errors & issues. Just give us a call at +1 716-992-6371 or write to us at [email protected]. We usually respond quickly. If you are facing any issues then please contact us, and we will be happy to help you.Linksys Atlas Pro 6 Setup
Live Chat
Linksys Atlas Pro 6 Setup Options
Collect The Linksys Atlas Pro 6 Login Details
Linksys App-Based Easy Setup

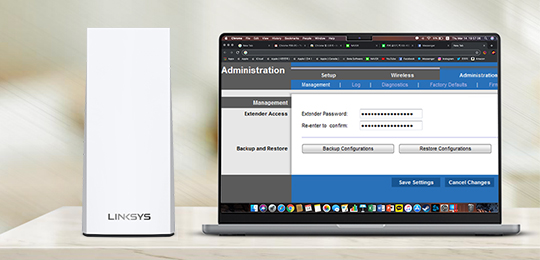
Execute Linksys Atlas Pro 6 Web-Based Setup With These Steps
Change Linksys Atlas Pro 6 Setup Password
Resetting The Atlas Pro 6 Device to Factory Default Settings
What’s in the Linksys Atlas Pro 6 Manual
Connect to Our Technical Support Team When Nothing Works
Common Linksys Wifi Extender Setups
Some Issues You Might Face