Linksys Velop MX12600 Setup
Live Chat
Live Chat with our experts & get real-time answers to all your queries.
Chat Now
Let’s Talk
Tap below to discuss your Linksys issues with our experts and get the solution.
Call Us
Need help with Linksys Velop MX12600 Setup? We assure you to provide you with top-notch assistance. We have a competent team of technical professionals who deliver remote support directly to you to help you with all sorts of technical issues that you may face while handling your Linksys Velop MX12600.
Execute Linksys Velop MX12600 Setup
Generally, the Linksys Velop MX12600 is a tricky process because of its complexity. You may find it tough to process its steps, especially if you don’t have a basic understanding of it. But, you need not worry if you are up for setting up your Velop device. We will assist you to complete the same quickly and efficiently.
There are two methods by which you can easily do the setup process of the Linksys MX12600 Velop device by Linksys app or without the app.
Via Linksys App- Do MX12600 Velop Setup
- First, download the Linksys application from the Google Play Store on android mobile phones.
- After that, open that application and fill in the required details.
- In the end, follow all the display instructions.
- You will need to make a Linksys smart WiFi account by which you can use this app to see and change the Velop system settings from any place where you have an internet connection.
- Easily change the network name and security password.
- Install guest access.
- Attach the gadget to the WiFi with the help of WPS.
- By parental control- block the internet.
- Verify the speed of the internet connection.
Note: During the configuration process of Linksys Velop MX12600 you will get an email from the home network. Tap that link in the email.
Without App Method- Do Linksys Velop MX12600 setup
If you fail after trying the above method, then try this method.
- First, settle the Linksys MX12600 power plug in the electrical socket.
- Now, join your Linksys MX12600 Velop mesh WiFi system to the modem or the router modem by using an ethernet cable
- Next, switch on your Linksys Velop mesh WiFi system.
- After that, launch navigation on the WiFi-containing gadget and enter the Linksys Velop web address in the URL bar.
- Following this, the Linksys MX12600 setup page permits all the terms and conditions, and tap on the next option to visit the wizard configuration page.
- On the next screen, enter the WiFi security password and network name for the 2.4GHz and 5GHz bands.
- Make a new password for the mesh WiFi router and tap “Next.”
- Link to New WiFi SSID.
- As of now, simply follow all the Instructions which you recieve on your device screen, to complete the Linksys Velop MX12600 setup process.
- In the end, restart your Linksys Velop device after completing the configuration process and start enjoying the exceptional wireless internet connectivity service.
Therefore, the setup process will be completed by doing Linksys Velop setup without the app method.
Note: After the Linksys Velop MX12600 setup if you are facing any issues then follow the lower solution tips to fix those issues.
Upgrade Linksys Velop MX12600 Firmware
To fix the disconnecting issue of the Linksys Velop MX12600 device, improve the Velop’s firmware.
- Initially, install the latest firmware file of Linksys Velop on your laptop.
- After that, visit the Linksys Velop login page.
- Next, hit on the internet connectivity option.
- Thereafter, pick that downloaded firmware file.
- In the end, tap on the start button and wait for a few minutes to upgrade the Linksys Velop firmware completely.
Reset Linksys Velop MX12600 Device
- Initially, search for the reset hole button.
- Afterward, push the reset hole button located at the bottom of the Linksys Velop MX12600 device.
- Furthermore, press the reset hole button with a paperclip for 8 to 10 seconds.
- Lastly, all the Velop LEDs will turn off.
- Hence, your Linksys MX12600 device is now completely reset.
Note: After the reset of the Linksys MX12600 Velop device you will need to do again the Linksys Velop MX12600 setup. As of now, the Linksys Velop issue is now solved.
Overview Of Linksys MX12600 Velop Gadget
At Front/Top Of Linksys MX12600 Velop Device
The top LED on the Linksys MX12600 Velop device determines the information about the operation of the node.
- A blinking blue LED establishes that the device is powering up.
- When a solid blue LED lights up then it means your Linksys Velop device is successfully connected.
- The installation process of Linksys Velop is in progress when the purple LED starts blinking.
- Your Linksys Velop device is now ready for the setup when a solid purple LED starts flashing.
- A solid blue LED stays that catches no internet from the modem.
- Due to the weak connection, a solid yellow LED started flashing.
At Back Side Of Linksys MX12600 Velop Gadget
At the back side of the Velop device, you can see the four ports.
- USB 3.0 Port: Attach and send USB drives to your network. It is used for sharing local files only. It is also not made for sharing the peripherals such as printers, scanners, cameras, etc.
- Ethernet Port: Join an ethernet cable to these gigabit ethernet ports and to other wired gadgets on your network. In case, your Velop has more than one node, then use one from that port to link with your modem or modem router.
- Power Port: Attach the AC power adaptor to this power port.
- Internet Port: Join an ethernet cable to the yellow gigabit ethernet port and to the fire modem. In case you are using this Velop device as a child node in a mesh WiFi system then you may use this port to make a wired connection to another node.
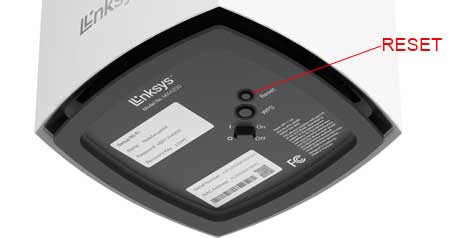
Bottom View Of Linksys MX12600 Velop Gadget:
At the bottom of the Linksys MX12600 Velop device, you can see the three buttons.
- Power button
- WPS button
- Reset button
After reading this page, we hope you will learn a lot of things such as login, setup, and troubleshooting tips, as well as the overview of the device. In case after trying the above troubleshooting tips if the issue is not solved then try to contact our team experts. Our email id is [email protected].
Common Linksys Wifi Extender Setups
Some Issues You Might Face
If you are facing any issues then please contact us, and we will be happy to help you.
Linksys Customer Service