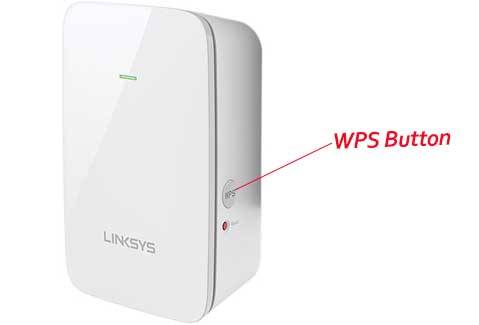
Live Chat with our experts & get real-time answers to all your queries. Chat Now Setting up a Linksys RE6350 WiFi range extender is mandatory to start using its internet services. It is an easy process, but you still may need help with performing the Linksys RE6350 setup. If you are unsure about the Linksys extender setup or got stuck in the middle of the configuration process, do not worry as we are sharing the complete Linksys RE6350 WiFi extender setup guide with you here. Linksys RE6350 is a dual-band WiFi range extender and a part of the Linksys AC1200 extender series. It promises better network coverage and signal strength. The speed of the device can go up to 1200Mbps which is enough for home-based purposes. As a homeowner, if you are seeking a better alternative to your home’s existing wireless network, Linksys RE6350 could be a great pick. It can potentially eliminate and resolve all types of possible wireless network issues you may be experiencing. Therefore, you should give it a try without thinking much about it. Linksys RE6350 Setup is a crucial step that cannot be missed out. This is because your Linksys extender device cannot start rebroadcasting the data signals of your existing router to your space without the completion of this process. There are a few different Linksys extender setup options that you can utilize including the WPS (WiFi-Protected Setup), an official Linksys app-based setup, and an extender.linksys.com configuration. Each of these Linksys extender setup processes is performed differently. The WPS setup process takes the least time as you just have to push the WPS button during this Linksys RE6350 setup process. On the other hand, the app-enabled setup process and web-based configuration option can be a little lengthy and time-consuming process. You can opt for any of these setup options depending on your existing router’s compatibility and your choices. Since there are not many steps involved in the WPS setup process, it is a go-to setup option for most Linksys WiFi range extender users. However, to make use of this option, users must have a WPS button on their existing routers that they wish to extend. Here we are sharing the 5 easy steps that you need to execute one by one to complete the Linksys RE6350 setup using the WPS method. Your Linksys RE6350 setup should be completed within a couple of minutes. We recommend you restart your extender device before connecting it to your devices and start using it. It enables your WiFi range extender to deliver a higher internet speed and an overall amazing performance. Linksys provides an app that enables users to perform a variety of functions readily without even touching the extender device. You can modify the extender’s settings, control the access, and manage the parental functions. In addition to this, you can configure your Linksys RE6350 WiFi device with the help of this versatile app. Here is how the Linksys RE6350 setup process goes when you opt for an app-based setup option. Before starting the process, it is crucial to see if you have all the pre-requirements ready with you like the Linksys app installed on your device, an active wireless internet connection, and an electricity supply. Once you ensure all these things, you can get rolling with the following setup steps: It is the toughest setup process among all the options we have got as you have to perform this completely manually. Generally, users prefer the WPS setup method or the app-based method. The manual setup option is usually the last choice for them. If the WPS setup process or app-based configuration method doesn’t work for you, you can consider this particular option. Here is how you need to perform the Linksys RE6350 setup manually: Although there are enough Linksys extender setup options with easy and straightforward processes, experiencing errors while attempting to complete the setup is very common. If you find yourself puzzled in the middle of the Linksys RE6350 setup process, you should try out the below-outlined steps to fix them. These troubleshooting steps should work for you to resolve your extender setup issues. In case you are still unable to perform the setup process, feel free to connect to our technical support team. They will assist you in resolving all your Linksys RE6350 setup errors. If you are facing any issues then please contact us, and we will be happy to help you.Linksys RE6350 Setup
Live Chat
Setting Up Linksys RE6350 WiFi Extender Device
Linksys RE6350 Setup Using WPS
Linksys RE6350 Configuration Using the App
Setup Steps to Follow
Performing Linksys RE6350 Setup Manually
Try These Steps to Fix Linksys RE6350 Setup Issues
Common Linksys Wifi Extender Setups
Some Issues You Might Face