Live Chat with our experts & get real-time answers to all your queries. Chat Now This user guide will assist you to do the Linksys RE7310 setup with the host router network and resolve the configuration issues of the Linksys RE7310 device. It comes under the IEEE 802.11ax/ac/a/n/g/b and 802.3ab/u standards. It supports the WPA-2 and WPA-3 wireless security encryption. On this page, you will learn all A to Z information about the Linksys RE7310 setup. So, read this page carefully, otherwise, you can face issues with your Linksys RE7310 extender. There are three methods to do the configuration process of the Linksys RE7310 extender. Just follow the lower steps to try the Linksys RE7310 setup method one by one. Note: You can only do this method when your existing router supports the WPS button. If your existing router does not have the WPS button then don’t waste your crucial time on this method try another method. If you get stuck at any point during the time of the WPS method, then you can also try this web browser method. Try this method, if your client device asks you to fill in or enter the Linksys extender pin. On the client gadget, write the extender pin which is listed on the WiFi-protected setup screen. (Pin is also written on the tag or the bottom of the Linksys RE7310 device). When the connection is successfully done the WPS LED of the Linksys RE7310 extender is solid. Now, within two minutes tap OK on the Linksys RE7310 extender WPS screen. There are many methods by which you can extend the performance of your Linksys RE7310 extender device. To upgrade the firmware of the Linksys RE7310 range extender you will need to visit the web management page of an extender. After that, select an administration option from the Linksys extender setting page and then select the software upgrade option. Now, wait for a short while to download the latest firmware file on your computer or laptop. The best placement is to locate your extender in the central location of your house and office. By doing this you will enjoy the fast speed of the internet in all directions of the WiFi signal. Also, make sure not to locate your extender and router near the electronic appliances, because metal appliances absorb all the WiFi signal which comes from the extender and router. Another way to boost your Linksys router’s WiFi signal is by changing the antenna. The host routers come with an omnidirectional antenna; this type of antenna sends a WiFi signal equally in all directions. Omnidirectional antennas extend the strength of the router’s WiFi signal by broadcasting it in one direction. By pressing the reset hole button. Which is located at the back side of the extender device, you can fix any type of extender issue and increase the range of the extender network. Make sure to only push the reset button for 8 to 10 seconds and don’t press it with much more pressure. Note: After doing the reset process you will need to do the Linksys RE7310 setup process again. With the assistance of this Linksys RE7310 setup page, you will learn all A to Z basic information about the device. If you are facing any type of trouble after doing the login and setup process then don’t hesitate to contact our Linksys team experts by dropping a mail at [email protected] or by +1 716-992-6371 phone number. If you are facing any issues then please contact us, and we will be happy to help you.Linksys RE7310 Setup
Live Chat
How To Visit Linksys Web Management Page
How To Install Linksys RE7310 Extender
By Pushing The Linksys RE7310 Extender WPS Button
By Web Browser Do Linksys RE7310 Extender Installation
Pair Linksys RE7310 Extender To Router- By Extender Pin
Troubleshoot Linksys RE7310 Login Issue
Fix Linksys RE7310 Extender Not Connecting Issue
How To Improve Linksys RE7310 Extender Performance
Upgrade Linksys RE7310 Extender
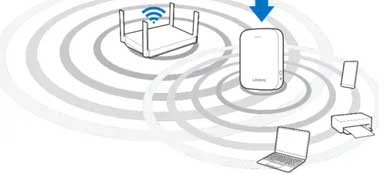
Swap Linksys RE7310 Extender Device Placement
Replace the Antennas
Reset Linksys RE7310 Extender
Common Linksys Wifi Extender Setups
Some Issues You Might Face