Linksys Velop MX5501 Setup


Live Chat

Live Chat with our experts & get real-time answers to all your queries.

Chat Now

call us

Lets Talk

Call us to discuss your Linksys issues with our experts and get the solution.

Linksys Velop MX5501 Setup is an essential process that must be completed first after installing the router device. If you aren’t aware of how to perform it, here we can guide you on the same.

Like many new-generation Linksys router devices, Linksys Velop MX5501 is an intelligent Mesh WiFi device. It uses dual-band frequencies including 2.4 GHz and 5 GHz to broadcast radio signals to up to 2700 sq. ft. of the area. As per Linksys, this Velop WiFi device is best suited for 4K/8K video streaming, next-level gaming, and high-quality video conferencing. You can enjoy these entertainment options without any interruption when connected to a Linksys Velop MX5501 router device.

There are so many good things about this modern-generation device but what makes it the top choice of people is the quick and easy Linksys Velop MX5501 Setup option. As a user, you need to perform a few simple steps to get the Linksys Velop MX55001 setup done in minutes.

Basic Requirements to Carry Out Linksys Velop MX5501 Setup


Similar to the setup process of most of the Linksys Velop router devices, there are some basic requirements to carry out and complete the Linksys Velop MX5501 setup. Those requirements include:

  • A modem that has a wireless data network supply from your existing ISP
  • An ethernet cable that functions well
  • A computer, tablet, or mobile device that has an updated operating system and browser
  • A Linksys Velop MX5501 kit that includes at least one Velop node
  • An electrical outlet that has an adequate electricity supply
  • The latest version of Linksys Velop MX5501
Linksys Velop MX5501 Setup

Performing Linksys Velop MX5501 Setup Using an Android System


Setting up a Linksys Velop MX5501 router device is uncomplicated. If you wish to utilize your Android device for Linksys Velop MX5501 setup, here is the process that you need to implement:

  • Plug in the router and let it boot up to start the Linksys Velop MX5501 Setup
  • Connect your Android device to the internet
  • Open the Linksys app on the device and go to the dashboard
  • Choose “Set Up a New Product” from the “Menu”
  • Go with the “Add a node to xxxxxxxx” option
  • Now, move ahead by choosing the “to extend my Wi-Fi with a new child node” option
  • Next, turn on the Bluetooth function on your Android device
  • Move ahead in the setup process as per the instructions displayed on your device screen
  • Add another Linksys Velop node once you have added a parent or child node successfully
  • Power cycle your Velop router once the setup is done and start enjoying the high-speed internet

MX5501 Setup Using an iOS Device


Although the iOS-based Linksys Velop MX5501 setup is not much different from the Android-based setup process, there are some steps that are performed differently using different interfaces. Here are the steps you require to follow to complete the iOS-based Linksys Velop router setup:

  • Go to the App Store on your iOS device and then download & install the official Linksys app. Once done, make sure you have installed the correct app. There are many Linksys clone apps that you need to avoid downloading.
  • If you don’t have a cloud account with Linksys, you will need to create one. Tap “Create a Linksys account” and follow the on-screen instructions to get the account creation process done.
  • Tap the “Set up a new product” button and then select “Velop Whole Home Mesh Wi-Fi” to proceed further in the process.
  • Follow the instructions that are displayed on the screen to set up your Velop node.
  • Connect the Velop node to your modem and power it on. The app will guide you through the rest of the process.

If you have additional Velop nodes and you wish to add them, you can do that. Tap “Add Nodes” and follow the instructions displayed on the screen. Once your Linksys Velop router network is added, you can customize its setting by changing the Wi-Fi name and password, modifying the parental controls feature, and more. That’s it! Your Linksys Velop MX5501 is now set up successfully and ready to use. If you run into any issues during the setup process, you can consult our technical support team anytime.

Linksys Velop MX5501 Setup Using a Web Browser


Setting up the Linksys Velop MX5501 router device without Linksys App is possible. You need to visit the Linksys login & setup portal for that. Here are the steps that will help you complete the Linksys Velop MX5501 setup using a web browser. Find them out below.

  • Use an Ethernet cable to connect your Velop node to your modem. Make sure the Velop node is powered on.
  • Use another Ethernet cable to connect your computer to one of the Velop node’s LAN ports.
  • Open a web browser on the computer that you use the most.
  • In the address bar, enter the default IP address for the Velop node, which is 192.168.1.1, and press Enter.
  • Enter the default login information for the Velop node, which is “admin” for both the username and password, and click “Log In.”
  • The web-based setup page will guide you through the setup process. You’ll be prompted to enter a new password for the Velop node and to set up your Wi-Fi network name and password. You can also customize your network settings and security features at this stage.
  • If you have additional Velop nodes to add to your network, you can do so using the web-based setup page.
  • Once you’ve completed the setup process, make sure to save your settings before exiting the web-based setup page.

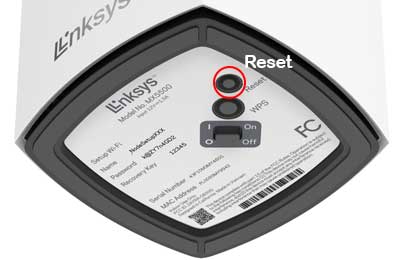
Resolving Linksys Velop MX5501 Setup Issues


Encountering some errors during the Linksys Velop MX5501 Setup is common. These issues need to be addressed right away or else they spoil your entertainment plans completely. Here are some effective troubleshooting steps that may help you fix Velop MX5501 setup issues.

Linksys Velop MX5501 Setup Issues
  • Power Off & Unplug the MX5501 Device and then Plug In and Power it On Again
  • Adjust the Distance Between the Router and the Client Device or Shift them to Another Room
  • Reset the Linksys Velop Router to Factory Settings by Pushing the Reset Button
  • Change the Client Device and Try Connecting to the Velop Router Again

If you are facing any issues then please contact us, and we will be happy to help you.

Linksys Customer Service